
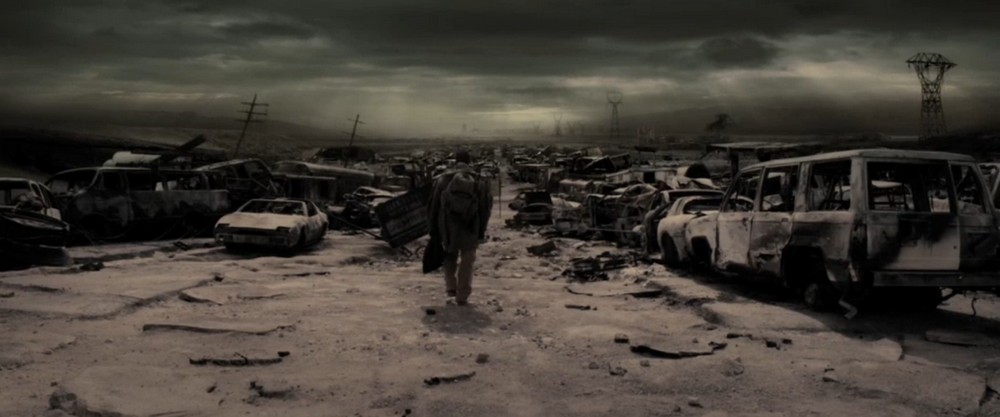
I have many ideas of how the scene should look after seeing different things around and about. This picture is what I think it should look like (taken from Google).
Research I have done is into what buildings will look like, how I should lay out the scene, which materials will best fit my objects and how to make textures for the things in my scene. Ideas for my scene have come from films and games I have myself:
1. The book of Eli
2. I am legend
3. Resident evil films
4. Fall out 3/Vegas
5. S.T.A.L.K.E.R.: Call of Pripyat


When thinking up the idea of how I would go about building the scene and what I want it to look like I started with an idea in my head and let it grow seeing what other ideas I could think of. Because I have a fairy short attention span I have been using the time in which I daydream to just think about the films I've seen or the games I've played and then formed what I think will work as a scene.
The first thing I set about doing was getting my scene layout sorted. Using Maya I made up a quick scene with specific values for width and height for everything involved to know what I was able to work with. The left image is a top down view and the right is the perspective.


I will explain it using the left image. The colours were used to make it easier for me to see what each thing was and to keep different things apart. The red will be my main exploratory building in the animation and I'm planning on making up the first and second floors to explore. In front of the red building is the teal cube which is going to be a statue of the Greek titan Atlas which will also be the name of the red building/company. The two other teal objects in the screen will be the car park located behind the red building and the one behind the green and yellow will be delivery parking for the shops. The green and yellow will be some kind of shop or public building. The darker blue objects are the roads around the scene.
The other grey areas in my scene will be left as pavement. I have left out the side of the scene as I'm still deciding on what I'm going to do with it yet.
 |
| Basic painted wall, slightly bumpy look |
 |
| Basic street curb, gravel like look |
 |
| Basic wallpaper, old worn look |
 |
| Basic floor tiles, old worn look |
 |
| Tiled wall, stained and dirty look |
So far I have spent most of my time on Photoshop learning how to make different textures and also making them look believable. I have been on YouTube watching tutorials and found a way of using different filters and layer effects to make things look a little 3D and to give them a stained look so I may have gone over the top in using them at the start here.
Road attempt 1.


I first made this road in Photoshop and was fairly happy with it but thought I could do more. I showed it to a few friends to get some more opinions and then came to the conclusion that I could add more effects.
Road attempt 2.


After doing some more researching and checking out some more online tutorials I added the outer lines and then gave all of the lines on the texture a bevel and emboss layer effect to give them that slightly raised look as I feel that’s more realistic when I go out and look at the paint on the road. The cracks have been added to make it have more of that run down look to it which is also why I wore away at the paint on the road.
I want to vary the textures I use in my scene so I want to create half of them or more myself with/without real photos and then I want to use some real photos as well. I am happy with all the textures that I made above but when making them I got caught up in the creation of them and forgot to use the offset tool in Photoshop to check if they were tile able so when I went to test them in Maya I didn't really get what I was looking for so that’s still something I need to do.
The next thing I will do is to start building up my scene and to start on the character, I will continue to make up textures and collect images on my camera to use for them.
Up to 18th October.
Since my last progress report i have mainly done research, gathered some resources and started on props in my scene. I've taken my camera most places I've been just to get images that I can tile in my scene so for example roads walls, pavements, grass etc. With the research I have been looking into ways of making my scene have more 'feel' to it, by that I mean to make it more spooky and scary to an extent, one thing I'm looking into doing is adding in a mist to the scene to reduce the vision and making you feel more detached from anything else. After looking up the film 'Silent Hill' the other day it has also given me a lot to go by. The two scenes I felt best fit the ideas I have are:


Recently i have been working on the scale of my scene so i have set the settings to meters and started creating the scene and objects. the first thing i made was the floor and road part of my scene, i'm leaving the buildings and props out of this scene and building them separately but i already have the measurements for when i import them all into one scene. So far i have made starts on the entire floor, the first building, props and some normal maps/textures.
When creating my floor and road scene i came across a couple of problems. I've spent ages trying to fix one and have the scene set out in 2 different ways. The first way was to simply create a plane with 50 segments in both height and width and then from there i can measure the spaces needed, extrude faces and bevel edges for the pavement/curb. all of it was simple until it came to texturing because then on my screen i had my own textures all set out on the right faces but after doing the render the main roads faces would have another texture on. I tried to avoid this problem by making separate pieces of floor and then connecting them together but this proved to be a longer way of doing it so now I've made a new plane and made sets out of the pieces of road to make selection easier.
Another problem i keep coming across is when i render it seems to cut some of the faces in half and ruin the texture applied. I've had a little look into it but not got any fixes as of yet, i'm leaving it till a bit later to fix all these small bugs.

After what i thought was 'fixing' my first problem with the texturing i then came across it in this scene. in the back there is a parking lot that you cant see to well as it has the pavement texture when in the scene it clearly has the basic road texture.
With my first building i have set out the basic size with an extruded cube and then done what i did with my floor scene by creating separate parts and piecing them together. i textured the floor just to seep how it would look in the scene.
 |
| The pieced together building |
 |
| Blinn floor texture. |
When i first made my textures i got carried away with all the layer effects i could use and how good i thought they looked that i forgot to make some of them tillable. Because of this I've had to go back over some of them and change it so they are tillable, after then applying these textures i noticed that i had a recurring pattern going across my scenes making it obvious how small the image was. I made the images small as i didn't want them to be too big and slow things down, after deciding id rather go for a better look I've changed them to much bigger images so the textures are more varied.
 |
| 500 pixels |
 |
| 2000 pixels |
I have made a start on the person i'm going to have animated in my scene, i have started to make them in 3DS max. I'm doing the one half first and will then mirror over, i will then have to rig and animate her.

I've been doing what I call research by playing some games recently and looking at how they use textures and how smooth some of the meshes look. While playing assassins creed 3 i noticed that the textures when in a cut scene seem fairly basic but believable, in one particular cut scene i noticed how the table had no beveled/smoothed edges and looked too angular, also the characters lip syncing wasn't what I expected it to be, this is making me wonder how much I need to do in my scene. I purchased S.T.A.L.K.E.R.: Call of Pripyat as it was an influence on what I planned my end scene to look like.

In this picture I've looked up on how to make the cracked floor scene and have started to build a cracked brick wall texture by building it in Maya and then going from there. I do like the random tufts of grass but am not too sure how I would go about placing them in my scene as I only have a small patch of grass and the rest is concrete/tarmac.
Up to 18th November.
Because I want some story behind my scene i have been looking at welcome signs and company signs to go with my main building in the scene. I spent a day on Photoshop making different versions but still couldn't quite decide. I came across a final design in the end which will go on a sign somewhere within my scene and from that I will make the bigger version to place on the building.

Im also now focusing on how to make better textures/bump map. to do this i have been using one of my Maya books for help, there is a chapter on how to use texture maps to get the normal, diffuse and specular of objects in your scene. using this together with Photoshop has been really interesting but at the same time is a lengthy process.
 |
| Maya scene |
 |
| Normal map obtained |
 |
| Specular image |
Doing it this way does seem more detailed but I'm not sure how often i will use this way to get bump maps. I do feel I have overused the Brownian bump map within Maya but then its always given me the effect im after I have a way of making texture files in Photoshop that i enjoy and think looks good, maybe not as accurate as making normal maps but still looks good, i can bevel and emboss the mortar if i were to do it that way which indents that part and then add a couple of filters/effects to get the worn down look.
Up to 14th December
I have now completed the character i'm going to animate in my scene and produced a rig which i made in one of my modules to use. The character's body to me looks great, just how i wanted it to be but the head even though i tried to copy from an image doesn't look right.

To sort out the problem with the head i have been playing with my newly acquired graphics tablet in Mudbox. The head I have been created is disfigures and i'm going for the 'infected' look to go with this abandoned area that i'm creating, to try and give it some story and mystery. The head is currently around the 500,000 poly count in its highest form but only 2000 in the base model which isn't really a lot. I haven't made the head based on any reference or material, I have just gone along with it as I've changed it.

With the animation I plan on making I will use this head on the first models body, they will wake up in one part of the scene lost and confused, the character will then look around the scene until they find the only reflective surface available only to find out that they have been infected with something.
Up to 14th January
Since Christmas I have been making buildings and placing them into my main scene to set up for the animation. I have been using a recently found program to me called crazybump to produce different texture maps for me to use. I was doing research into how to reduce my poly count but still get the objects and details i would like to have to actually stand out, with the displacement maps it produces i'm able to get closer to the textures and images that i'm looking for. An example is using my road texture from scratch and then producing the normal, displacement, specular and occlusion maps from it and being able to use this in my scenes.
 |
| Displacement |
 |
| Normal |
 |
| Specular |
 |
| Occlusion |
I tried to do the same in another scene using my brick texture that I made and for whatever reason this is the result of using it.

I did manage to get the maps all working together after creating them from scratch and they all seem to work fine for now.
After fixing whatever the problem was with the displacement maps I went crazy and made all other textures this way. The image here shows the sign I made for the first building and the brickwork around it, each of these has a displacement map. The sign is meant to look wooden and chipped away and the brickwork has the bricks separated and filled in gaps to make them look as if they are coming out.

I finished building the first of the back buildings and then created the second/third which I merged together so in my scene I would only have 3 back buildings rather than the 4 I originally planned on. Currently the 2 buildings look like this.
 |
| Building 1 |
 |
| Building 2 |
The buildings have been completed for now but when I have made all props for the main scene I will start to add more detail to them so for example I will have cables running along the walls, arches, pillars and other things like that to make them look more building like and less like cubes with holes.
With my main building I have been following a tutorial in one of my books for Maya, the only problem i have come across so far is the poly count for it if i carry it on the way i'm going will be far too big. The detail for it is what i'm going for with the other buildings but the poly count just means ill have to be more efficient in the way that I make it. This image is the window frame I will be using, the poly count is just under 3500 which to me sounds far too high.

At the moment my main scene currently looks like this.

For my march submission I was trying to get a mock animation done but ran into some problems with the rig i'm currently using on my model, I could move the entire mesh from one location to another and animate it over however many frames but it would only stay in one shape and place the entire time whenever i set a new key position. Because of this my animation was just a basic walk around.
The animation begins with the character regaining consciousness around the back of the building in the delivery area. The character gets up and slowly works their way around the front and enters the first building. While in the first building they come across a picture of what they think is them. After realizing what the picture is the character continues to walk back outside and towards the front side of the main building. Getting to the main building the character then goes to walk inside but catches a glimpse of the sign in front of the statue only to see the their own reflection in the statue.
Up to March 14th
For my scene to look more used and full I've been looking into adding different assets. so far I've managed to create bins, benches, power lines, boxes, trees, thorns, lamps and cars. The cars were made in mudbox from the base models and were just used as fillers where as the better things are the thorns and trees which came from Maya paint effects.